To display a grid as a list
You can reference a grid, and display it on another form as a list. To configure the list correctly, it can help to understand how Marketing Operations stores grids.
*
*
For example, if users create two projects from the same template, the rows added by the corresponding grids in both projects are added to the same database table, but the grid for each project has access to only its own data.
To achieve this, a database table that holds grid data must have two columns: one to uniquely identify each row, and one to identify the parent ID: the ID of the project or marketing object that contains the grid.
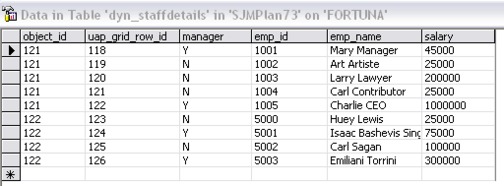
The Table Key Column that you set for a grid holds the parent ID for the row. All rows in a single grid have the same value for this column. As a result, it does not uniquely identify a row of data.
The Forms Editor automatically generates a column, uap_grid_row_id, for each grid. A list view just requires a column that uniquely identifies rows. Therefore, to use the same table as the grid for a list view, you can specify uap_grid_row_id as the key column for the list. Do not use the same key column that you specified when you specified the grid data table.
Example
To illustrate, look at this example:
*
*
*
*
The database table that holds the data for these two grids might look like the following illustration:
Table with columns for object_id, uap_grid_row_id, manager, emp_id, emp_name, and salary
The first several rows belong to the grid on TRS001. The final few rows belong to the grid on TRS002.
Each project displays only its own portion of the data in this table. However, if there is a list that uses this table for reference, it displays all the rows in the table, as shown here:
Grid with columns for Employee ID, Name, Base Pay, and Manager
Since the column name uap_grid_row_id is reserved, you must not use this as a column name when you specify the columns for the grid.
You can filter a list so that it displays only the grid entries from its own object (project or marketing object). Continuing the previous example, create a project template that includes two custom tabs:
*
*
To ensure that only the entries from the current project display on the Staff List tab, filter on the parent ID of the list.
When you create the grid component for the list, set the following values:
*
*
Parent Id Column Name: object_id (as shown in the database table earlier in this example). This value must match the value in the Table Key Column for the grid.